
 Goran Kosanovic for The Washington Post
 Contact The Editor
 Articles By This Author
But sometimes (or most of the time), a big cake is not in the offing. And yet sometimes (okay, a lot of the time), I still have a craving for cake.
Enter the cake truffle.
We can thank Christina Tosi, chef and owner of the ever-growing and ever-popular bakery Milk Bar, for helping cement cake truffles - you may also know them as cake balls - in the cultural zeitgeist. What started as a snack for Milk Bar staff to use the scraps left behind after round layers were cut from large sheet pan cakes is now a staple on the menu at its shops in Washington, New York City, Toronto and Las Vegas.
Milk Bar now sells so many cake truffles that cake is baked specifically for it. Its truffles come in flavors such as birthday cake and chocolate malt cake.
Cake truffles, however, are also an ideal treat for when you don't want to follow a recipe at all, when you have ingredients you want to use up, and when you just want to have a good time.
"For me, the spirit of the cake truffle is all about your imagination," Tosi says.
Before you let your imagination run wild, it's worth understanding the major components of the cake truffle: the cake, a binder, a chocolate shell and an outer coating of crumbs.
The cake
Tosi says she prefers using fresh cake when possible, but truffles allow you to breathe new life into slightly stale cake or cake you have under- or overbaked. Homemade is great, of course. No one will judge you, or even notice, if you use cake made from a mix or cake you bought at the store. Vanilla (yellow) cake is the most neutral base for customizing flavors with your binder and coating. Citrus-flavored cakes are versatile, too. Whatever you choose, break the cake up into relatively small, even pieces and place them in a large bowl. Set aside a little cake you can use for adjusting the consistency later if you need it.
The binder
This is what will hold the cake truffles together. Options include milk, flavored milk (add extracts or mix with nut butters), beer, liquor, jams, jellies or fruit purées. Work the cake and binder together with your hands, adding a little at a time. When the mixture is ready, you will almost be able to knead it into one big mass, Tosi says. If about a tablespoon of the batter rolled into a ball crumbles, you need more binder. If it's a little squishy but holds its shape, you're golden.
Scooping
Form the cake mixture into 1-tablespoon portions with a disher, small ice cream scoop or your hands. Roll them into smoother balls. "You're not looking for perfection, you're looking for something with round edges," Tosi says of the shape. "They're meant to be imperfect." If you are working in stages, this is a good stopping point to pop the truffles in the refrigerator for a few days or the freezer for up to a few months.
The coating
Tosi likes white chocolate for its fairly neutral flavor, but milk or dark chocolate work well with a chocolate cake. Chips or bar chocolate are fine. Melt the chocolate in the microwave in 30-second bursts, or in a double boiler, with a heatproof bowl set over a pot of simmering water. (Don't let the water touch the bottom of the bowl.) Adding a neutral oil such as canola, grape seed or vegetable once the chocolate melts helps make the chocolate more fluid and set the coating. Olive oil or flavored oils can work in the right ingredient combinations. Tosi's strawberry-lemon cake truffles called for a ratio of 12 ounces chocolate to 2 tablespoons oil. Keep the chocolate warm and fluid, which can be done in a slow-cooker or by just leaving the bowl set over the warm water.
The goal is to achieve a thin coating of chocolate. "You don't want your cake truffle to taste like white chocolate," she says. Warm chocolate contributes to a thin layer of chocolate, but so does coating the truffles with your hands. (I tried dipping the truffles directly in the chocolate, which proved too thick and resulted in a clumpy crumb layer once it came time to dip.) Gloves are especially nice here. Put a tablespoon or two of the melted chocolate in your hands and then roll the ball around between them. Do a few in a row and drop them into your crumbs.
This is where having friends is not only fun but also efficient, because you can set up a chocolate and crumb assembly line.
The crumbs
The crumbs add crunch and flavor, whether it be sweet or salty. This is your chance to make a first impression on appearance, which is one reason freeze-dried fruit is a great choice. Whatever you choose, keep the texture fairly fine. A food processor is ideal, but there's still a lot you can do with a zip-top bag and a rolling pin or wine bottle. Think about raiding the pantry for your crumbs. Pretzels, cereal, graham crackers, potato chips and nuts are just a few possibilities.
Put your coating in a bowl large enough to hold a few truffles at a time, but not so large that the crumbs are too shallow. Ideally, Tosi says, you're just scooping the crumbs over and around the truffles to get a thin, even layer that adheres to the chocolate without disturbing it. Pop the coated truffles in the refrigerator to set for a few minutes. At this point, you can serve or store them. Tosi suggests trying them at three temperatures: fresh out of the fridge while cold, at room temperature and frozen. "It's just a totally different sensory experience," she says.
Don't forget to have fun
Tosi says kids especially enjoy making these, although it can be a great group activity for parties of any age. Fun also means letting yourself be free to try whatever flavor and ingredient combinations you want. "Get creative with what's in your pantry," Tosi says.
Need some inspiration? Here are a few ideas to get you going.
chocolate cake + kirsch + dark chocolate + freeze-dried cherries
chocolate cake + peanut butter thinned with milk + dark chocolate + ground peanut butter cereal (e.g. Panda Puffs)
vanilla cake + lemon juice + white chocolate + pistachios
vanilla cake + caramel sauce + white chocolate + graham crackers
chocolate cake + beer + milk chocolate + pretzels
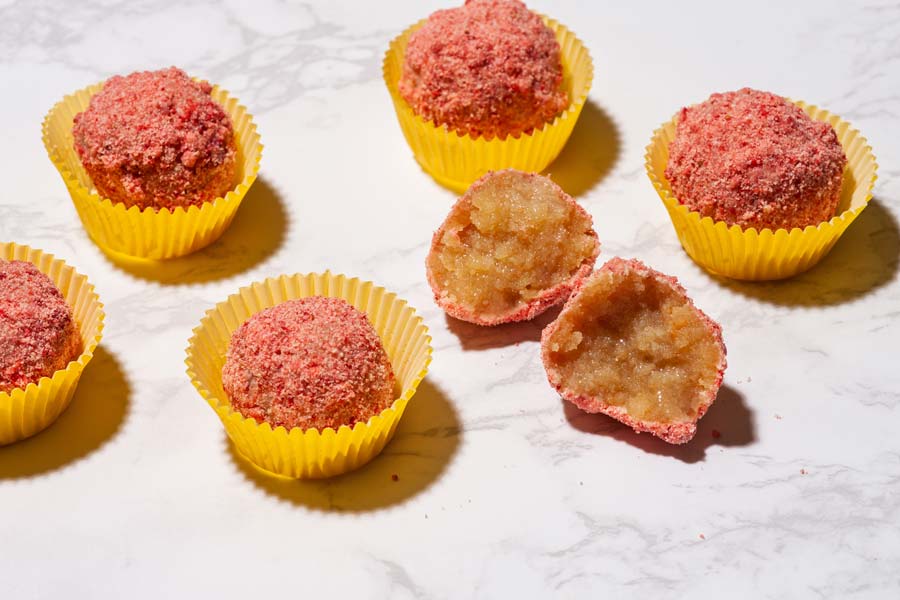
STRAWBERRY LEMON CAKE TRUFFLES
SERVINGS: 50 half-ounce truffles
This treat with the flavors of summer is on the menu at the new Milk Bar location in Washington. Cake truffles are one of the signature items created by Milk Bar founder Christina Tosi.
There are several elements that go into this dessert, some of which can be made in advance (to streamline final assembly). One is the strawberry sand; we pulverized freeze-dried strawberries and that resulting powder worked well.
Using food-safe gloves for the coating step will make for less mess.
Make Ahead: The cake can be baked, cooled, wrapped in plastic wrap and refrigerated up to 5 days. The strawberry sand can be held at room temperature for a week or up to 1 month in the refrigerator or freezer. The finished truffles can be refrigerated for up to 1 week, and frozen for up to several months.
Storage Notes: You'll have leftover strawberry sand, which can be sprinkled on top of ice cream, yogurt and atop the frosting on cakes and cupcakes. If you aren't inclined to make the strawberry sand, try rolling the truffles in Nesquik Strawberry Flavor Powder. That creates a different taste, but one that Tosi endorses.
Adapted from a recipe by Milk Bar chef and owner Christina Tosi.
Ingredients
For the cake
• 8 tablespoons (1 stick) unsalted butter, at room temperature
• 1 1/4 cups granulated sugar
• 1/4 cup packed light brown sugar
• 3 large eggs, at room temperature
• 1/2 cup buttermilk (regular or low-fat)
• 1/2 cup canola oil
• 1 tablespoon vanilla extract
• 1 1/2 cups cake flour
• 1 teaspoon baking powder
• 1 teaspoon kosher salt
For the strawberry sand 1/2 cup nonfat milk powder
• 1/4 cup plus 2 tablespoons all-purpose flour
• Scant 2 tablespoons cornstarch
• 2 tablespoons granulated sugar
• 1 3/4 ounces freeze-dried strawberries, finely ground in a food processor (see headnote)
• 8 tablespoons (1 stick) unsalted butter, melted
For assembly
• 12 ounces white chocolate, coarsely chopped (may substitute white chocolate chips)
• 2 tablespoons canola oil
• 1/4 cup fresh lemon juice (from 2 lemons)
Steps
For the cake: Preheat the oven to 350 degrees. Grease a quarter baking sheet with cooking oil spray, then line with parchment paper or a silicone liner.
Combine the butter and sugars in the bowl of a stand mixer or handheld electric mixer; beat on medium-high for 2 to 3 minutes. Stop to scrape down the sides of the bowl. Add the eggs; beat on medium-high speed for 2 to 3 minutes, until well incorporated and the mixture is lightened. Scrape down the sides of the bowl once more.
Whisk together the buttermilk, oil and vanilla extract in a liquid measuring cup.
On low speed, gradually add the buttermilk mixture to the butter-egg mixture. Increase the speed to medium-high; beat for 4 to 6 minutes, until the mixture is practically white, twice the volume of the original butter mixture, and completely incorporated. Do not rush the process. You're basically forcing too much liquid into an already-fatty mixture that doesn't want to make room for it. Stop to scrape down the sides of the bowl.
Add the cake flour, baking powder and salt; beat on low speed for 45 to 60 seconds, just until the batter comes together and any remnants of dry ingredients have been incorporated. Stop to scrape down the sides of the bowl. If you see any lumps of cake flour in there while you're scraping, beat for another 45 seconds.
Use a spatula to spread the cake batter in an even layer in the quarter baking sheet. Give the pan a tap on the counter top to even out the batter. Bake (middle rack) for 30 to 35 minutes; the cake will rise and puff but will remain slightly buttery and dense. At 30 minutes, gently poke the edge of the cake with your finger: The cake should bounce back slightly and the center should no longer be jiggly. Leave the cake in the oven for an extra 3 to 5 minutes if it doesn't pass these tests. Transfer to a wire rack to cool completely.
For the strawberry sand: Preheat the oven to 275 degrees. Have a quarter baking sheet at hand.
Combine the milk powder, all-purpose flour, cornstarch, granulated sugar and freeze-dried strawberries in the bowl of a stand mixer or handheld electric mixer; beat on low speed until well incorporated.
Add the melted butter and beat (low speed) until blended. The butter will make the mixture come together in small clumps, then the clumps will break down into a well-combined sand.
Spread the sand on the baking sheet; bake (middle rack) for 10 to 12 minutes. The sand should remain pink, without any hint of toasting. Cool completely before using or storing.
For assembly: Place the white chocolate in a microwave-safe bowl; melt on HIGH in 30-second increments, as needed, until it becomes smooth when stirred. Whisk the oil into the chocolate. Cover to keep warm; reheat as needed. Place the strawberry sand in a separate bowl.
Transfer the cake to a mixing bowl, breaking it up into small, even pieces as you go, reserving a little bit in case you need to adjust the consistency later. Add half the lemon juice; toss with your hands until the cake becomes moist enough to knead into a ball. Add up to 2 tablespoons more lemon juice, as needed.
Line a baking sheet with parchment paper or a silicone liner. Use a small ice cream scoop, a tablespoon measuring spoon or your hands to form about 50 equal portions of the moistened cake mixture, rolling them into balls about 1 inch in diameter (a bit smaller than a Ping-Pong ball; each will weigh about 1/2 ounce). These are your truffles.
Pour a tablespoon or two of the melted white chocolate in the palms of your (gloved) hands; roll each truffle between them to give it a thin coat; add more white chocolate as needed. Put 3 or 4 chocolate-covered truffles at a time into the bowl of strawberry sand. Immediately toss to coat, before the white chocolate sets. (If the chocolate does harden, just coat the truffle with another thin layer of melted chocolate.) As you coat the truffles, place them back on the same baking sheet or on a separate, clean one.
Refrigerate the finished cake truffles for at least 5 minutes (to fully set) before serving or storing.
Nutrition | Calories: 130; Total Fat: 8 g; Saturated Fat: 4 g; Cholesterol: 20 mg; Sodium: 35 mg; Total Carbohydrates: 15 g; Dietary Fiber: 0 g; Sugars: 10 g; Protein: 1 g.
Sign up for the daily JWR update. It's free. Just click here.
(COMMENT, BELOW)