
 Contact The Editor
 Articles By This Author
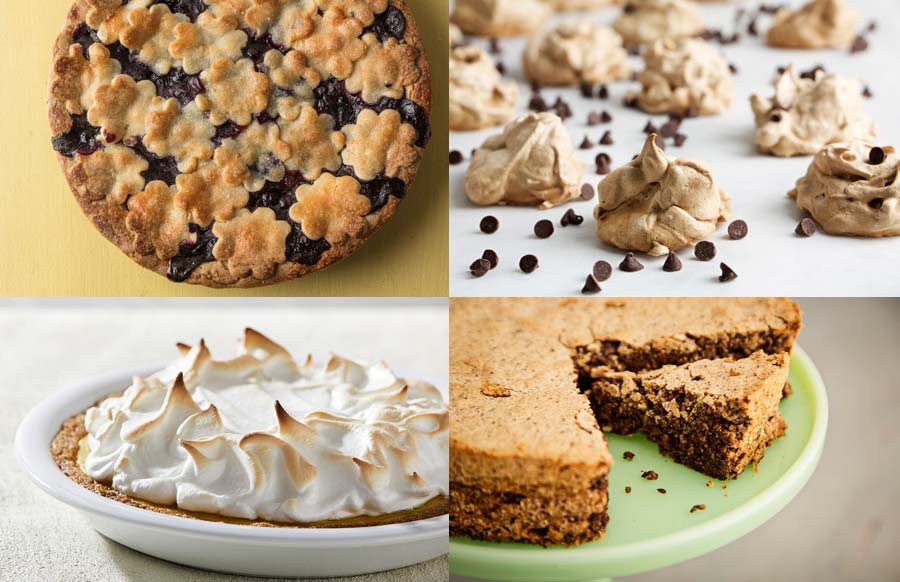
• Passover Key Lime Pie.
This pie is beyond delicious with a nutty crust and a toasty meringue on top. While the method of making the custard might seem odd, as you'll get chunks of curd forming in the mix as it cooks, don't worry - just follow the directions and it'll turn out perfectly.
• Chocolate Almond Tweed Torte.
This light flourless cake is packed with chocolate flavor. You can make it up to three days ahead and focus on the rest of your Passover spread.
• Passover Blueberry Pie.
A pie for Passover? Why not, especially when the crust is not only holiday appropriate, but also gluten free! Think of this crust as a blank slate to whatever celebration you're planning and feel free to mix up your fillings: maybe swap out some of the blueberries for peaches, or even apples.
• Mocha Chip Meringues.
Take your meringues to the next level with a hit of espresso and chocolate chips. No need to fuss over the form; they'll be devoured in no time.
• Chickpea Cookies.
Grab your cookie cutter and press out your favorite shapes: flowers, hearts, whatever you're feeling! If pressing out cookies feels like too much work, just roll these melt-in-your mouth treats into little balls. These cookies are perfect if you're following the Sephardic Passover rules; but if you're Ashkenazi, you'll need to wait until the holiday is over to make these.
![]()
PASSOVER KEY LIME PIE
MAKES: 8 servings
When kosher baker and cookbook author Paula Shoyer created this dessert, she wasn't trying to develop a Passover recipe. She wanted a Key lime pie with a better crust.
And she created one that just happens to be fine for serving at Passover: a tangy filling made with eggs and sugar on a walnut crust, topped with a nice meringue. Speaking of meringue: You'll need an instant-read or candy thermometer.
Make Ahead: The filling needs at least 2 hours' refrigeration to set. The pie can be made and refrigerated for up to 5 days, although for best results, you might wish to apply and bake the meringue on the same day the pie is served.
Ingredients
For the crust
- 4 tablespoons (1/2 stick) pareve margarine (contains neither meat nor dairy products)
- 3 1/2 to 4 cups walnuts, ground to yield 2 cups
- 3 tablespoons light brown sugar
• For the filling
- 5 large eggs, plus 3 large egg yolks
- 1 1/2 cups sugar
- 14 Key limes (may substitute 4 or 5 regular limes)
- 8 tablespoons (1 stick) pareve margarine, cut into small pieces
- 1 drop natural green food coloring (optional)
• For the topping
- 1/4 cup water
- 2/3 cup sugar
- 3 large egg whites
Directions
For the crust: Preheat the oven to 350 degrees. Place an 8-inch deep-dish pie plate or 9-inch pie plate on a baking sheet.
Place the margarine in a medium microwave-safe bowl and heat on HIGH for 45 seconds or until melted. Stir in the walnuts and brown sugar; mix until combined. Transfer to the pie plate and press to cover the bottom and about 1 inch up the sides. Bake for 15 minutes so the crust is firm and set. Transfer to a wire rack to cool; leave the oven on.
For the filling: Combine the eggs, yolks and sugar in a heatproof bowl; set the bowl over a medium saucepan filled with a few inches of barely bubbling water, over medium heat.
Stir to combine the egg mixture, then zest 6 of the Key limes (about a tablespoon) over the mixture. Squeeze the juice from those 6 plus the remaining 8 Key limes and stir it into the mixture (1/2 cup total). Cook uncovered for about 25 minutes, stirring occasionally, to form a thick custard. Be patient and do not stir too much. Remove from the heat. Whisk in the margarine in small pieces until the cream is smooth. Stir in the green food coloring, if using.
Pour the filling into the prepared crust, spreading it evenly. Bake (with the pie plate on the baking sheet) for 20 minutes (at 350 degrees) or until the outside edges of the filling are set; the inside can remain a little jiggly. Let cool, then refrigerate for at least 2 hours.
For the topping: Combine the water and sugar in a small saucepan over high heat, stirring to dissolve the sugar. Cook without stirring until the mixture reaches 230 degrees; dip a pastry brush in water and use it to brush down any sugar crystals that might form on the sides of the saucepan.
Meanwhile, beat the egg whites in the bowl of a stand mixer fitted with a balloon whisk attachment or a hand-held electric mixer on low speed to start, then on high speed to form stiff peaks. Reduce the speed to low; gradually add the cooked sugar mixture, letting it fall along the side of the bowl and not directly onto the egg whites or the whisk attachment. When all of the cooked sugar mixture has been added, increase the speed to medium-high; beat for 1 or 2 minutes to form a thick, shiny meringue.
Use a silicone spatula to spread the meringue evenly over the pie filling. If desired, use a culinary torch to lightly brown the surface of the meringue. (Alternatively, you can bake the pie with the meringue at 450 degrees for about 3 minutes to brown the top.)
Cover carefully so the meringue remains untouched; refrigerate for up to 5 days.
Recipe source: Adapted from Shoyer's "The Kosher Baker: Over 160 Dairy-Free Recipes From Traditional to Trendy".
(Buy it at a 21% discount by clicking here. Or in KINDLE edition at a 50% discount by clicking here.)
MOCHA CHIP MERINGUES
Like snowflakes, each of these meringues is light, airy and unique; there's no need to make them look perfect or all the same. The recipe can easily be halved or doubled.
One of the best ways to separate the eggs is Julia Child's method of letting the whites drip through your slightly parted fingers, leaving the yolk intact for other jobs. To make sure there's no yolk at all in your whites (so they will beat up light and fluffy), separate each egg over a small bowl and add the whites one by one to the larger bowl where they will be beaten. It's easiest to separate cold eggs, but then let the whites sit for at least an hour to warm up a bit so they will beat better.
In testing, we liked using mini chocolate chips for these meringues, but regular-size ones will work as well.
Make Ahead: The meringues can be stored in an airtight container at room temperature for up to 4 days. Tested size: 24 pieces
• Ingredients
- 1 tablespoon unsweetened cocoa powder
- 1/2 teaspoon instant espresso powder
- 3 large egg whites
- Pinch kosher salt
- 1/2 cup sugar
- 1/2 cup semisweet mini chocolate chips
Directions
Preheat the oven to 300 degrees. Line a baking sheet (or two) with parchment paper, then grease the paper with cooking oil spray.
Pulse the cocoa and espresso powders in a blender or food processor several times to create a powdery mixture.
Combine the egg whites and salt in the bowl of a stand mixer or handheld electric mixer, beat on low speed until frothy, then on medium-high speed until soft peaks form. Gradually add the sugar, about a tablespoon at a time, continuing to beat until stiff peaks form, and the mixture is thick and glossy. This process should take 8 to 10 minutes. Stop to scrape down the bowl a few times as you work.
Sprinkle the cocoa-coffee mixture over the egg mixture; beat on low speed until well incorporated. Increase the speed to high; beat for about 15 seconds. Gently fold in the mini chocolate chips by hand, until just blended.
Use two spoons (tableware) to deposit a total of 24 dollops of the meringue mixture onto the baking sheet; they do not need to look perfect and can be just 1 inch apart. Bake (middle rack) for 50 minutes, until crisped and set. Let cool completely before serving or storing.
Recipe source: From D.C. cook Susan Barocas.
PASSOVER BLUEBERRY PIE
This recipe can be your go-to gluten-free pie recipe year-round. The crust is lighter than typical pie dough, so the blueberry flavor seems more prominent.
The fat you use - unsalted butter, coconut oil or margarine - needs to be frozen for 30 minutes before you add it to the food processor. You'll need a 9-inch pie pan. Use a flower-shaped or scalloped cookie cutter (1 1/2 inches) for the top crust.
Make Ahead: The dough for the crust needs to rest in the freezer for at least 2 hours, or up to overnight. The rolled-out bottom pie shell can be frozen up to a few days in advance. The pie can be held at room temperature for a day or two.
Tested size: 8 servings
Ingredients
For the crust
-
1 1/2 cups ground almonds (may substitute almond meal or almond flour)
- 2/3 cup confectioners' sugar, plus more for dusting
- 1/3 cup potato starch
- 4 tablespoons unsalted butter, or coconut oil or margarine, frozen for 30 minutes and then cut into pieces
- 1 tablespoon cold water
- 1 large egg, separated into yolk and white
- 1/4 teaspoon vanilla extract (optional; see headnote)
For the filling
- 4 cups fresh blueberries, stemmed and rinsed
- 1/2 cup granulated sugar, plus 1 teaspoon for sprinkling
- 1/2 teaspoon ground cinnamon
- 1 teaspoon finely grated lemon zest (from 1 lemon)
- Dash salt
- 3 tablespoons potato starch
Directions
For the crust: Combine the ground almonds, confectioners' sugar and potato starch in a food processor; pulse for 10 seconds to blend. Add the frozen butter, coconut oil or margarine pieces; process until the mixture resembles coarse sand.
Add the water, egg yolk and vanilla extract, if using; process just until a dough comes together, being careful not to over-mix. Gather into a ball and flatten, then break off a little more than one-third of the dough. Wrap both pieces of dough separately in plastic wrap and flatten into disks. Chill in the freezer for at least 2 hours, or up to overnight.
Remove the larger piece of dough from the freezer and let it defrost until you can press it gently. Place on a piece of parchment paper sprinkled with confectioners' sugar. Sprinkle the top of the dough with some more confectioners' sugar and cover with a piece of parchment. Roll the dough into a 10-inch round. Peel back the top parchment and sprinkle confectioners' sugar on the dough as you roll. Once or twice, flip over the package of parchment and dough, peel off the bottom and sprinkle some more confectioners' sugar on top. Re-cover with parchment and flip back over.
Remove the top parchment. Place your hand under the bottom parchment, lift the dough and invert it into the pie pan. Use your hands to gently press and fit the dough to the pan. Remove the remaining parchment (which is now on top). Use a knife to trim the dough, then patch up any bare or thin spots, and use a fork to prick the dough in several places. Reserve any dough scraps for additional cutouts that will form the top crust. Cover the pie shell with plastic wrap and freeze until you're done with the filling, or up to several days.
Roll the reserved scraps between two pieces of parchment to a thickness of about 1/3 inch thick, then remove the top parchment and cut out the shapes. Unwrap the remaining piece of dough (from the freezer) and repeat the same step to make more dough cutouts; you'll need a total of about 20. Place them on a lined baking sheet and freeze until firm.
For the filling: Make sure there are no stems on the blueberries. Place 3 cups of them in a stain-proof mixing bowl. Use a potato masher or large fork to break them down a bit. (Be careful not to make them too soupy.) Add the granulated sugar, cinnamon, lemon zest, salt and potato starch, stirring to incorporate. Gently mix in the remaining cup of berries.
Preheat the oven to 350 degrees.
Remove the bottom pie crust shell from the freezer and place on top of a baking sheet lined with parchment paper or a silicone liner. Spread the filling evenly in the pie crust shell. Remove the dough cutouts from the freezer; use a thin metal spatula to transfer them one by one on top of the filling, in a decorative pattern that does not completely cover the filling.
Use a pastry brush to brush the remaining egg white over the dough cutouts atop the pie, then sprinkle the remaining teaspoon of granulated sugar all over. Bake (bottom rack) for 55 minutes to 1 hour, or until the top crust cutouts are golden and the filling is bubbling. (If the edges of the cutouts or edge of the pie seem to be getting too brown before the pie is done, crimp aluminum foil loosely over them.
Cool for at least 1 hour before serving or storing.
Recipe source: From cookbook author and baking instructor Paula Shoyer. Tested by Bonnie S. Benwick.
CHICKPEA COOKIES
These are tiny and delicate, melt-in-your-mouth treats.
You'll need a 1-inch cookie cutter; a flower shape is often used for these. If you don't have one, simply roll the dough into small balls and then decorate with the slivered pistachios.
Make Ahead: The cookies can be refrigerated in an airtight container for up to 2 weeks.
Ingredients
-
1/2 cup vegetable oil or melted unsalted butter
- 3/4 cup (94 grams) confectioners' sugar
- 2 teaspoons ground cardamom
- 1 teaspoon rosewater
- 1 3/4 cups (157 grams) sifted chickpea flour, plus more for rolling
- 1/4 cup slivered pistachios, for garnish (see headnote)
Directions
Whisk together the oil or melted butter, the confectioners' sugar, cardamom and rosewater in a mixing bowl until smooth and creamy. (If you use an electric mixer for this, beat on medium speed for 3 minutes.)
Gradually add the chickpea flour over the course of 10 minutes, to create a smooth dough that is not sticky. If you're mixing by hand, dust a work surface with chickpea flour, then knead the dough for the 10 minutes, adding more chickpea flour as needed. If you're using an electric mixer, beat on medium speed for 10 minutes, stopping to scrape down the bowl a few times, as needed. Wrap the dough tightly in plastic wrap and let it rest at room temperature for about 20 minutes.
Preheat the oven to 300 degrees. Line a baking sheet or two with parchment paper or silicone liners.
Dust the work surface with a little more chickpea flour. Unwrap the dough; use a rolling pin to roll it out to a thickness of about 1/2 inch. Cut out shapes with your small cookie cutter. Decorate each cookie by sticking a pistachio sliver in the center of each one.
Arrange the cookies on the baking sheet(s), spacing them 1 inch apart. Bake one sheet at a time (middle rack), for 15 to 20 minutes, until the bottom edges of the cookies are lightly golden. Transfer the baking sheet to a wire rack; cool the cookies completely before serving or storing.
Recipe source: From Washington cook Yeganeh Rezaian. Tested by Andy Sikkenga.
CHOCOLATE ALMOND TWEED TORTE
Flourless chocolate cakes can be dense, but this one, named for its interior look, is light yet seems to have more chocolate flavor.
You'll need a 9-inch springform pan.
Serve slices with dollops of lightly sweetened whipped cream.
Make Ahead: The cake can be stored in an airtight container at room temperature for up to 3 days.
Tested size: 8-10 servings; makes one 9-inch cake Ingredients
- 1 cup (5 ounces) whole almonds, with or without skins
- 7 ounces good-quality unsweetened chocolate, roughly chopped
- 1 cup (7 ounces) granulated sugar
- 1/8 teaspoon kosher salt
- 1 cup egg whites (from 7 to 8 large eggs)
- 1/4 teaspoon Passover cream of tartar (lemon juice)
- Confectioners' sugar, for dusting
Directions
Position an oven rack in the lower third of the oven; preheat to 350 degrees. Line the bottom of a 9-inch springform pan with parchment paper, then grease the pan with cooking oil spray.
Combine the almonds, chocolate, 1/2 cup of the granulated sugar and the salt in a food processor; pulse until the almonds and chocolate look very finely chopped but not completely pulverized.
Combine the egg whites and cream of tartar in the clean, dry bowl of a stand mixer or handheld electric mixer; beat on medium speed until soft, moist peaks are formed when the beaters are lifted. Gradually add the remaining 1/2 cup of granulated sugar, continuing to beat until the egg whites are stiff but not dry.
Add one-third of the nut mixture to the egg whites; use a large flexible spatula to fold it in by hand until nearly incorporated. Fold in half of the remaining nuts, then fold in the rest.
Scrape the batter into the pan, spreading it evenly. Bake (lower rack) for 25 to 30 minutes, until the torte rises and is golden brown on top and a toothpick inserted in the center of the cake emerges free of batter, other than a little melted chocolate. Transfer to a wire rack to cool.
Serve at room temperature, dusted with confectioners' sugar. Recipe source: Adapted from "Pure Dessert," by Alice Medrich.
(Buy it in KINDLE edition for just $9.99 by clicking here.)
Tested by Bonnie S. Benwick.
(COMMENT, BELOW)