
 Stacy Zarin Goldberg for The Washington Post
 Contact The Editor
 Articles By This Author
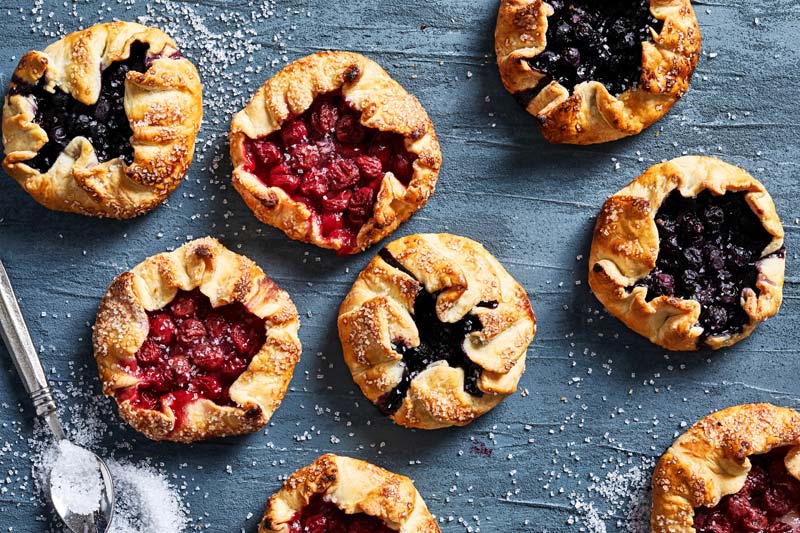
Often hailed as a "rustic" or "no-fuss" version of pie, galettes, with their casually pleated edges, have a reputation for being easier than fitting pie dough into a pan and crimping a crust. While I agree (mostly) with this characterization, the galette technique is not without some nuance. A galette requires engineering, a structure sturdy enough to hold back the flood of juicy filling, because without a pan to provide the form, the dough has to be pliable but not stretchy, so the architecture holds. For structure, flake and sheer beauty, I rely on one of the pillars of piemaking - Keep It Cold - at every step along the way.
While a galette is sublime at the end of a meal, served to four or five friends, it doesn't stretch to serve a large gathering. Turning to the engineering principles of a classic galette, I devised a recipe for that makes a miniature version with plenty of fruity filling. Mini galettes are meant to be carried to backyard get-togethers, picnics in the park or hikes into the mountains.
Start with a pie dough recipe you trust and chill the dough after making it. Work quickly to form the four disks and keep them chilled while making the filling. If the dough rolls out crumbly and cracked at the edges, it will be difficult to pleat; too wet and it will tear; too warm and it will unfold in the oven, creating galette-as-pizza. Cold dough is the key to a successful galette, as well as the secret to extra-flaky, extra-crispy crust.
Avoid rolling the dough too thin: A proper crust should have heft or it won't be sturdy enough to hold back all the warm juices. A trickle of blueberry juice flowing from a little galette is a delight. A flood of fruity syrup all over the baking sheet? Not so much. Freezing the little pies before baking helps the structure hold shape.
Because a mini galette is meant to be eaten out of hand, cut larger fruit into bite-size pieces, which will also avoid lumpy edges. Once the sugar is stirred into the fruit, the filling will get saucy, so mix it only after rolling out all the dough circles. (Once rolled, keep them refrigerated until ready to fill.) Then work quickly. A scattering of dry bread crumbs across the base absorbs some moisture and reduces the potential for the dreaded soggy bottom. Form pleats with the dough to contain the fruit and pinch closed. Then freeze the galettes, until hard, before baking.
About that soggy bottom: The best way to counteract a doughy base is to bake the galettes on a hot surface. Slide a pizza stone or an inverted baking sheet into the oven while preheating. Then place the baking sheet with the mini galettes on top of this hot surface. The pies will cook from both the top and the bottom, and, when baked until the crusts are nutty brown and the filling is bubbling, will transform to an easy-to-handle galette.
While this may sound like a lot of fuss and bother, freezing prebaked galettes means you can make these pies in advance and bake them off as needed. In fact, frozen mini galettes will keep for months and can be baked straight from the freezer, making fancy dessert easily attainable when the mood strikes. And all that lovely fruit that's peaking now? Surround it with pastry today and it will be ready to serve when the leaves start to turn, tasting of the glorious early days of summer.
![]()
MAKES: 8 servings
There are a few tricks to these pretty pleated individual pies: Work quickly and keep the dough cold. Scatter dried bread crumbs across the dough before adding the fruit. To keep the juices from flowing before pleating the dough, do not stir the sugar and fruit together until the last minute.
MAKE AHEAD: Allow 30 to 45 minutes to freeze the galettes before baking. Frozen, unbaked galettes may be kept, tightly wrapped, for up to 3 months and baked directly from the freezer.
- Two (12-ounce) Flaky Pie Dough recipes, each formed into a block (see related recipe)
- 1/2 cup plain dried bread crumbs
- 1 cup (3 1/2 ounces) granulated sugar
- 1/3 cup (1 1/2 ounces) cornstarch
- 6 cups (24 ounces) berries, tart pitted cherries and/or peeled, diced peaches
- 2 tablespoons fresh lemon juice
- 2 tablespoons Grand Marnier, another orange-flavored liqueur or 1/2 teaspoon almond extract
- 2 teaspoons cold unsalted butter, each cut into 4 equal pieces
- 1 large egg
- 1 tablespoon water
- 1/8 teaspoon kosher salt
- About 1/4 cup sparkling sugar or turbinado sugar, for sprinkling
Steps
Directions
Line a baking sheet with parchment paper.
Remove one dough block from the refrigerator and allow it to warm slightly. Cut the dough into four (3-ounce) portions. Lightly dust your work surface and roll out one portion of dough into a round about 8 inches in diameter. Scatter 1 tablespoon of the dried bread crumbs across the center, leaving a 1-inch margin all around. Repeat with the remaining 3 portions of dough, and the bread crumbs, and then with the remaining refrigerated block of dough, so you have a total of 8 rounds that have bread crumbs on them.
Stir together the granulated sugar and cornstarch in a mixing bowl. Add the fruit, lemon juice and Grand Marnier or almond extract; stirring well to coat the fruit. Scoop out a scant, loose 3/4 cup of this fruit filling and plop it in the center of one dough round. Working quickly, lift the outside 2 inches of the dough edge and pull it up and slightly over the filling, leaving the fruit in the center exposed.
Work around each galette, folding the dough over on itself and forming a series of pleats to make a snug package about 4 inches across. Use the outside edge of your hands to cup the edges of the galette and gently press the dough into the fruit. Snuggle one small cube of butter into the center opening. Place the galette on the baking sheet. Repeat with the remaining dough rounds, filling and butter to create a total of 8 galettes.
Freeze them, uncovered, for 30 to 45 minutes, until firm.
Place a pizza stone or an inverted baking sheet on the middle rack of the oven; preheat to 400 degrees.
Lightly beat the egg, water and salt in a small bowl. Brush the folded edges of each galette with the egg wash, then sprinkle them with the sparkling or turbinado sugar. Slide the baking sheet into the oven on top of the pizza stone or inverted baking sheet, and bake for 35 minutes, until deeply golden brown with bubbling filling.
Cool for a bit before serving.
Nutrition | Per serving: 540 calories, 6 g protein, 72 g carbohydrates, 27 g fat, 17 g saturated fat, 90 mg cholesterol, 120 mg sodium, 3 g dietary fiber, 28 g sugar
FLAKY PIE DOUGH
MAKES: 4 servings (enough for a single-crust pie)
The above recipe calls for 2 portions of this dough. Prepare the dough in one batch in a large food processor or one at a time with any food processor smaller than 9 cups.
MAKE AHEAD: The dough needs to be refrigerated for at least 4 hours, and preferably overnight, before using. It can be refrigerated for up to 3 days, or frozen for up to 3 months. If frozen, defrost overnight in the refrigerator.
Ingredients
- 1 cup plus 1 tablespoon (5 1/2 ounces) flour, plus more for rolling
- 8 tablespoons (1 stick) unsalted butter, diced and chilled
- 1/8 teaspoon kosher salt
- 1/4 cup ice water
Directions
Lightly flour a work surface.
Combine the flour, butter and salt in a food processor; pulse 15 times or until the butter is reduced to pea-size pieces. Add all of the ice water and process just until the dough almost comes together.
Transfer the dough to the work surface and shape into a disk about 4 inches wide, or into a block 3 inches by 4 inches by 2 inches. Wrap tightly, in plastic wrap and refrigerate for at least 4 hours, and preferably overnight.
Nutrition | Per serving: 340 calories, 4 g protein, 30 g carbohydrates, 22 g fat, 16 g saturated fat, 60 mg cholesterol, 35 mg sodium, 1 g dietary fiber, 0 g sugar
Sign up for the daily JWR update. It's free. Just click here.
(COMMENT, BELOW)